 Skip to content
Below is a summary of the key changes introduced in this release
1. Search within Search: Additional Info and Custom Fields
If you’ve added an Additional Info field or Custom Info field under classification, you can search for the headers within those fields and select their values.
Benefits:
Users can quickly locate specific cases faster using search box
How it works:
Under Search within the search box, users can input field names, and associated values will automatically appear.
Navigation: Monitor ➡ Tickets ➡ Search Box at the top right

2. Post- Reply Classification Pop up:
Benefit:
Efficient Workflow: Streamline your customer service process by automatically triggering a classification popup after responding to inquiries or complaints, ensuring no customer feedback goes unaddressed.
How it Works:
– Respond to a customer inquiry or complaint.
– Automatically receive a popup prompting you to classify the interaction.
– Efficiently categorize the interaction for easy tracking and analysis, optimizing your customer service workflow.
Navigation: Monitor ➡ Settings ➡ Admin ➡ Ticket Settings ➡toggle to turn on “ENABLE CLASSIFICATION AFTER REPLY”
3. Publishing: Offer Creation on Google My Business
Now, with the latest update, creating offers on Google My Business is easier than ever. Simply select “Offers” from the dropdown menu to get started.
Key Features:
– Specify start and end dates for your offers.
– Craft detailed offer descriptions to attract customers.
– Include voucher codes for added engagement.
– Share redemption links to make claiming offers seamless.
– Add terms and conditions to ensure clarity for customers.
Navigation: Publish ➡ Compose new post ➡ Select Google Business profile ➡ Select “Offer” and fill all the required details
4. Publishing: LinkedIn user mention while making a post
When posting, simply type “@” followed by a user’s name to tag them. Now, you’ll see a list of all your followers to choose from, making tagging easier than ever!
Benefits:
Easily mention LinkedIn users in your posts by typing “@” followed by their name.
How it Works:
- While composing a post on LinkedIn, type “@” followed by the user’s name.
- A dropdown menu will appear, displaying a list of all your followers.
- Select the desired follower from the list to tag them in your post effortlessly.
Navigation: Publish ➡ Compose New Post ➡ Select LinkedIn Profile ➡ Type the content and "@" to tag a user
NOTE: You can only tag someone who is following your LinkedIn page
5. Draft Template: Add Table as a Draft
Introducing the ability to reply to clients using pre-defined draft templates.
Benefit:
– Utilize the new table draft template to provide structured and organized responses to client inquiries.
Note: This feature is available for email profile only.
Navigation: Monitor ➡ Settings ➡ Admin ➡ Draft Message Templates ➡ Click "Add Draft Message Template" ➡ Select Email profile, Give Title, Add the draft and Save
6. Compose Email
You can now create a new email from Konnect Insights in a separate window, enhancing your workflow efficiency.
Benefits:
You’re now able to create a new email from Konnect Insights in a separate window. Additionally, you can save drafts, review sent emails, add media, and utilize draft templates.
Users can now compose a new email from Konnect Insights in a separate window for improved workflow.
How it Works:
– Open Konnect Insights and navigate to the email composition section.
– Click on the option to create a new email.
– A separate window will open, allowing you to compose your email without disrupting your current workflow.
– Utilize features such as saving drafts, reviewing sent emails, adding media, and using draft templates to enhance your email composing experience.
Navigation: Profile Icon at top right ➡ Compose Mail
7. Twitter Comparison Overview Chart
The Twitter comparison overview chart enables users to compare key metrics such as Tweets, Mentions, Likes, Retweets, Engagement, Total followers, and Reach (Predictive) in a single, easy-to-read format.
Benefit:
Easily benchmark your brand’s performance against competitors, gaining valuable insights into areas of strength and areas needing improvement.
How it Works:
- Access the Twitter comparison overview chart feature within the platform.
- Select the brands you wish to compare, including your own brand and competitors.
- View a side-by-side comparison of metrics including Tweets, Mentions, Likes, Retweets, Engagement, Total followers, and Reach (Predictive).
- Analyze the data to identify trends, patterns, and areas for strategic action and improvement.
Navigation: Dashboard ➡ Add Chart ➡ Search "Twitter Comparison Overview chart" ➡ Add Char
8. Dashboard: Social Media Performance Widget
This new widget enables you to analyze campaign post performance across all social media channels used by your brand.
Simultaneously, you can analyze multiple social media profiles.
Receive detailed insights, including metrics such as posts made, engagement received, total reach, impressions, views, and plays for each platform.
How It Works: Access Social Media Performance from the dashboard.Select the desired social media platform(s) for analysis, including Twitter, Facebook, Instagram, and LinkedIn.
Navigation: Dashboard ➡ Add Chart ➡ Search for "Social Media Performance"
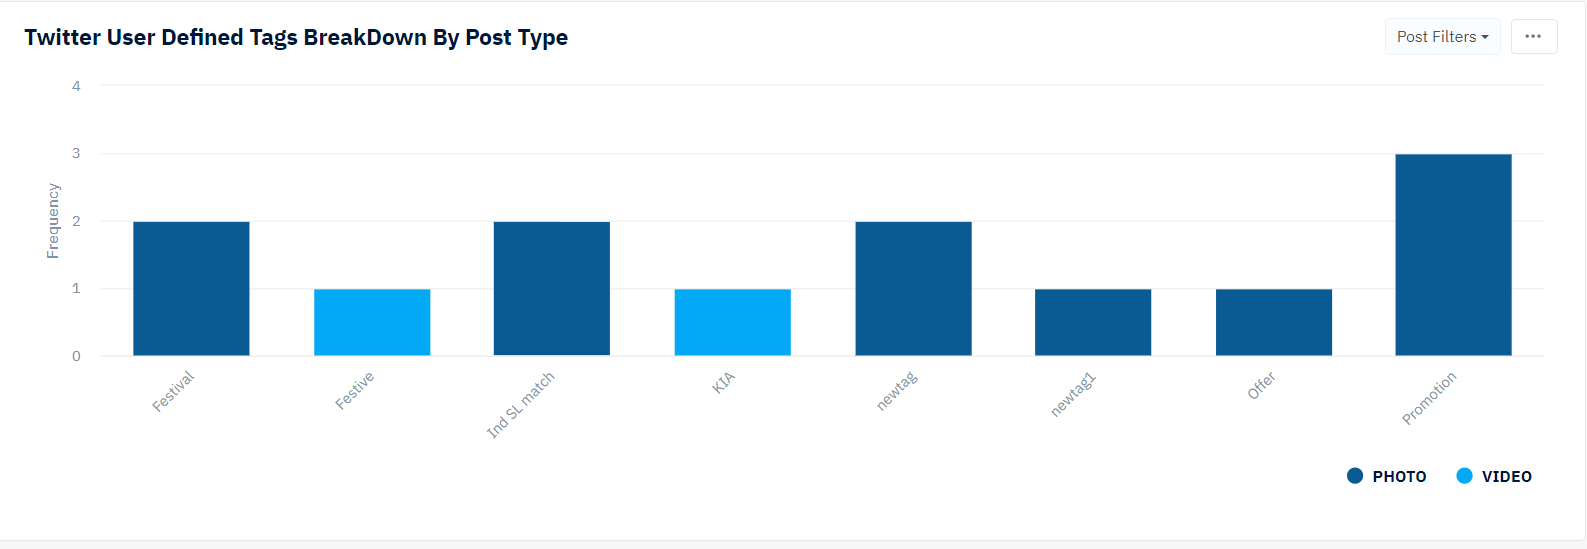
9. Chart: Social Analytics
- User Defined Tags BreakDown By Post Type
- User Defined Tags Engagement Rate
You can utilize Content Tag charts to assess Engagement Rate and Engagement Breakdown. They provide insights into comments, reactions, shares, and overall engagement for various hashtags.
Charts available for: Facebook, LinkedIn, Instagram , X ( Twitter)
Benefits:
– The Content Tag charts offer in-depth insights into engagement metrics, including Engagement Rate and Engagement Breakdown, for different hashtags, enabling a thorough understanding of content performance.
– Users can track engagement metrics such as comments, reactions, and shares, providing a detailed breakdown of audience interactions with specific hashtags.
CHART PREVIEW:

Navigation: Social Analytics ➡ Select a social Profile ➡ User Defined Tags Engagement Rate
10. Auto Removal of Messages from Queue:
Description:
Enabling this functionality will streamline message handling by automatically removing messages from the queue when marked as WIP, Follow-up, or Resolved. This ensures that agents can get new tickets and can efficiently manage their workload.
Benefits:
– Automatic removes messages from the queue upon marking as WIP, Follow-up, or Resolve.
– Efficient management of queued messages, reducing clutter and improving workflow.
– Ensures messages are promptly attended to without delay.
How it Works:
– When a message is marked as WIP, Follow-up, or Resolved, it is automatically removed from the queue.
– This action frees up space in the queue for new tickets to work.
Considerations:
– If this feature remains disabled, messages will stay assigned to the specific agent handling them until marked as Resolved.
Note: The functionality is enabled by default for the account. If the client wishes to disable it, this button can be used to do so.
Navigation: Monitor ➡ Settings ➡ Ticket Settings ➡ Toggle to DISABLE AUTO REMOVE FROM QUEUE (WIP / FOLLOW / RESOLVE)

Conclusion:
We hope you enjoy these updates and that they make your experience with our product even better. If you have any questions, concerns, or suggestions, please reach out to us at [email protected]. Your feedback helps us improve!


